Rewiring Your Home. The Truth About Rewires – Part 3

Rewiring Your Home. The Truth About Rewires – Part 3

Did You Get The Rewire You Paid For?

In part 1 of our Truth About Rewires series we looked at “The Cheapest Quote Rewire”, where everything is done as cheap and nasty as possible, and in part 2 we investigated “The Cosmetic Rewire” where everything looks good on the surface but the ugly truth is lurking just underneath.

Click here to read The Truth About Home Rewires – Part 1

Click here to read The Truth About Home Rewires – Part 2

Today we are going to discuss “The Too Hard Basket Rewire” which in some ways is a combination of the Cheapest Quote and Cosmetic rewires.

In a Too Hard Basket rewire the contractor starts out with good intentions and has quoted to replace all the old wiring in the home and do everything properly.

Unfortunately, when the going gets tough, the good intentions can fall by the wayside.

In a Too Hard Basket rewire, the easy stuff gets done properly but the difficult parts are left as they are, as the tradesmen decide some things are just too hard to deal with.

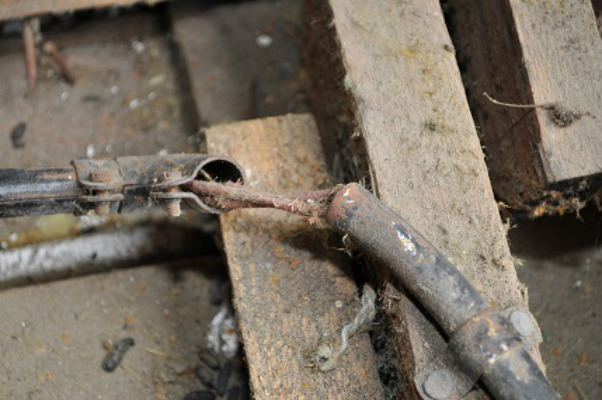
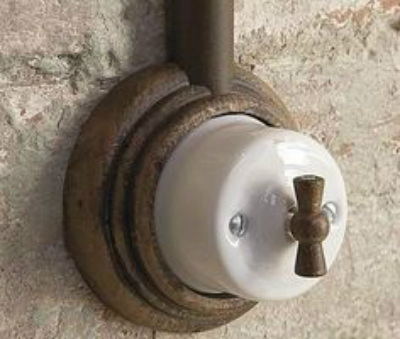
Typically this means any cable that is hard to access will not be replaced.  Those switch wires that couldn’t be pulled up the wall are left in place and reconnected to new switches.  The stove circuit is old rubber but it looks in reasonable condition so it’s left as is, to save that long crawl under the floor dragging a new circuit.

Maybe the job is taking longer than expected and the contractor is under pressure to get it finished as soon as possible.  Maybe the workers don’t have a high level of care and will just go back to the workshop and tell the boss it’s all finished.

Whatever the situation, the home owner has paid for a full and proper rewire, but with the Too Hard Basket rewire they are not getting everything they paid for.

We usually discover a Too Hard Basket rewire when we are called out to a fault caused by the old wiring.  The home owner assures us all has been rewired but our investigation soon reveals the truth.

The reason the lights in the back part of the house don’t work is because the original contractor didn’t take the time and effort to lift the roofing iron and replace the old cables running through the flat roof area.

We then do the work that should have been done during the rewire and the client pays again for something they already paid to have done.

There is a lot of confusion, and sometimes misdirection, about the extent of work that has been carried out during a “rewire”.

To avoid getting caught by a less than proper rewire you should always get a detailed quote that spells out exactly what work will be carried out.  And always use an established, reputable contractor to ensure the work you are paying for has actually been done.


For a free quote and advice on a “proper” rewire phone Mance Electrical on 6331 4711

Or send us a message using the form below

Rewiring Your Home. The Truth About Rewires – Part 2

Rewiring Your Home. The Truth About Rewires – Part 2

Not All Rewires Are Actually Rewires

In part 1 of our rewire series we explored the joys of “The Cheapest Quote” rewire, where everything is done to the bare minimum, using the cheapest materials, there’s no time to doing things properly and shortcuts are taken everywhere.

Click here to read The Truth About Home Rewires – Part 1

Click here to read The Truth About Rewires – Part 3

Another type of rewire we commonly see is “The Cosmetic Rewire”

With the cosmetic rewire everything looks good on the surface, but the ugly truth is lurking just underneath.

With the cosmetic rewire you get a brand new switchboard, new power point fittings and switches and light fittings, and everything that’s visible looks shiny and new.

You even get a few short pieces of brand new cable disappearing up into the roof space.

Unfortunately those pieces of new cable are all joined to the old cable that’s still crumbling away in the ceiling.

It’s the same story with the switches and power points.  The fittings are new but they are still connected to the old wiring.  Quite often that old wiring is in very poor condition and is a real safety issue.

The worst part is that often the home owner thinks their property has been properly rewired.  They believe their home is as safe as it can electrically be, with all the old dangerous cable gone for ever.

It’s a false sense of security based on false assumptions.

The home owner may have even paid for a complete rewire, but what they ended up with is quite different.

Cosmetic rewires are often found in homes that are offered for sale.

Potential buyers can see all the new fittings and they assume that everything is new.  Sometimes the real estate agents are working under the same false assumptions as the home owner and advertise the property as being rewired.

To avoid being caught out by the Cosmetic Rewire you should always get a pre-purchase electrical inspection on any property you are considering buying.  An investment of $150 can save you thousands of dollars in unexpected costs.

To avoid paying for a Cosmetic Rewire of your existing home you should always deal with a reputable electrical contractor and get a detailed quote that sets out exactly what extent of work will be carried out.

For a free quote and advice on rewiring your home phone Mance Electrical on 6331 4711

Send us a message here for a prompt reply

Rewiring Your Home. The Truth About Rewires – Part 1

Rewiring Your Home. The Truth About Rewires – Part 1

If you have an older home maybe you still have some older wiring in use as well.

These days all new wiring is thermoplastic insulated, with a life expectancy of at more than 40 years.  Older homes used a variety of cable types, all of which are now due for replacement.

The common types of original cable you might find in an older home include Lead, VIR and Rubber.

Lead insulated cables are well past their use-by date and can cause dangerous situations.  We recommend that all lead cable be replaced or disconnected immediately.

VIR is a cloth insulated cable installed in a split metal conduit.  The VIR system uses the conduit for earthing. Over time the insulation deteriorates and the conduit joints come apart and the earth connection is lost.

Rubber insulated cable becomes brittle as it ages and if disturbed the insulation just falls off, exposing bare wires.


All three cable types are potential fire and electric shock hazards.

The only way to safely upgrade these old cables is by rewiring your home..

A full rewire involves removing every piece of old cable and replacing it with new cable.  At the same time new switches and power point fittings are installed and the old fuse board is replaced with a new circuit breaker switchboard, with safety switches.

Your mains cables may also be replaced at this stage.  Your mains are the cables that go from your switchboards to the incoming power supply point.

Rewiring your home usually takes 3-5 days work to complete a full rewire with new mains and switchboard.

There are plenty of older homes in Launceston, so at Mance Electrical we do quite a few rewires, and we also see quite a few rewires done by others.

It’s obvious that all rewires are not created equal.

Some home owners think their house has been rewired – meaning completely and fully rewired, but the truth is often a little different.


The Cheapest Quote Rewire

One of the common situations we see is what we call the “Cheapest Quote Rewire”.

In the Cheapest Quote Rewire everything is done to the bare minimum.

The mains cables will probably be new, but the smallest possible size, with no room for expansion.

The switchboard will also be the bare minimum with no room for extra circuit breakers for additional circuits in the future.  Bad luck if you thought you might build on a couple of extra rooms later, or install a nice big heat pump.

An even cheaper trick is to leave your old mains cables in place and fit a load-limiting circuit breaker instead.  If you try and run your heater, oven and clothes dryer at the same time your power will overload and trip out.

The old cables may not be removed as required, due to the time that takes.  New cables will not be installed in a tidy manner and will not be clipped as required – again because of time constraints.

Much of the work may be done by unsupervised apprentices rather than qualified tradesmen.  Regulations are conveniently forgotten in the rush to get the job finished quickly.

With the cheapest quote rewire there is not enough time allowed to do a quality job.  The object is to win the job by putting in the cheapest price and then do it as quickly and cheaply as possible.

There are other types of rewire that are not quite what they seem.  Things might look good on the surface, but there might be an ugly truth lurking underneath

Click here for The Truth About Home Rewires Part 2 – The Cosmetic Rewire

Click here for The Truth About Home Rewires Part 3 – The Too Hard Basket Rewire


For a free quote on a “proper” rewire phone Mance Electrical on 6331 4711

Or send us a message using the form below

Does Your Stove Have An Anti Tilt Bracket?

Does Your Stove Have An Anti Tilt Bracket?

Anti Tilt Brackets Are Required To Be Fitted To All New Freestanding Stoves

A modern stove without an anti tilt bracket can easily tip forward, causing serious injury – usually to young children.

The most common type of injury happens when the young child pulls down the oven door and stands on the door as a step to get higher up.  The stove tilts forward, spilling boiling liquid onto the child, often causing horrendous injuries.

In order to prevent these injuries, all new stoves are supplied with an anti tilt bracket.  These metal brackets are usually designed to be screwed to the floor.  When the stove is pushed back against the wall the bracket locks onto the stove feet or a into slot in the back of the stove.

When the anti tilt bracket is correctly installed and the stove is pushed back against the wall, the bracket prevents the stove from tipping forward.  To comply with Australian Standards an anti tilt bracket should be able to withstand up to 50kg of weight applied to the door.

New stoves are much lighter compared to the old stoves they replace and most of the weight is at the top.   This means it is usually easier to tip over a new stove than an old one.

Currently, there is no requirement to fit an anti tilt bracket to an existing stove if it doesn’t have one.  But if you remove your old stove and install a new one you must fit the anti tilt device supplied by the manufacturer and according to the manufacturers instructions.

Some cheaper stoves have chains designed to be fixed to the wall behind the stove.  The chain system will only be effective if the chain is kept quite short and the end of the chain is fixed to a wall stud, not just screwed into the plaster.  The floor mounted anti tilt brackets are usually a better solution.

We have carried out repairs on plenty of fairly new stoves that have been installed without an anti tilt bracket.   Some installers are ignoring the regulations and installing new stoves without the brackets that prevent the stove tipping forward.

It is quicker and easier to toss the anti tilt bracket out with the stove packaging and pretend there is no such thing. However, any installer who does this is ignoring the manufacturers installation instructions and the Australian Standards and placing children’s lives at risk in order to save a few dollars.

When you get a new freestanding stove make sure your installer fits the correct anti tilt bracket to prevent the stove tipping, including the pin that prevents the stove sliding forward away from the anti tilt bracket.

When you book your job, make sure the installer you choose will remove your old stove and dispose of it free of charge!

And once your anti tilt bracket is securely fixed in place make sure you don’t leave pot handles hanging over the front of the stove where young children could reach up and grab them.

For Stove Change Overs In Launceston And Surrounding Areas Phone Mance Electrical on 63331 4711

The Difference Between An Electrician And An Electrical Contractor

The Difference Between An Electrician And An Electrical Contractor

There is an important distinction between an electrician and an electrical contractor.

An electrician is a person who has completed a 4 year apprenticeship, training alongside qualified tradespeople and regularly attending TAFE classes.  In order to become qualified, an apprentice must pass all their TAFE subjects and also the final exam, which is called the Capstone Test.

Once the apprenticeship is completed, the apprentice applies to the local regulator for an electrical practitioners licence.

When the license is granted the tradesperson is authorised to carry out electrical work in accordance with the AS/NZ3000 wiring rules.

Even though they are fully qualified and licenced there is one important restriction for a qualified tradesperson.

A tradesperson is not allowed to carry out electrical work on their own behalf, and charge clients for that work.  In order to conduct an electrical business the practitioner must obtain an electrical contractors license.

Gaining a contractors license requires further study, passing more exams and other requirements such as insurance cover and reporting obligations.

So your average tradesperson cannot set up in business for themselves.  They can only work for a licensed electrical contractor, unless they go through the process of obtaining a contractors license themselves.

Electrical contractors are required to submit paperwork to TasNetworks and the Electrical Inspectors for all but minor electrical works.  This results in their work being regularly inspected to ensure they are complying with the wiring rules and safety regulations.

Back-yarders who work without a contractors license do not advise the regulators of the work they do and subsequently that work is never inspected to make sure it has been done safely and correctly.

Back-yarders also won’t have the required insurance cover which means you could be left holding the bag if something goes wrong.  How do you think your insurance company would react if your home was damaged or destroyed as a result of unlicensed electrical work?

Always use a licensed electrical contractor for any electrical work, no matter how small, to ensure the safety of your family and your  property.


Mance Electrical, your licensed and experienced Electrical Contractor in Launceston, since 1920.

Phone us on 6331 4711.

Deadly DIY Electrical

Deadly DIY Electrical

Doing Your Own Electrical Work Is Dumb, Dangerous and Illegal.

The photo above shows one of four lights installed in a Launceston property by a home handyman.

You can see that the red wire – the live wire – is connected directly to the metal body of the light.

If you were to touch the metal part of the light while changing a blown globe you would receive a potentially fatal electric shock.   (more…)

Call Now Button